HOW TO BUILD A RAIN GARDEN
A rain garden has many features that you’d expect to see in any native plant garden. However, the dish-like construction and strategic placement of rain gardens aid in the capture of stormwater runoff from impervious surfaces, such as roofs and streets, and allow it to soak into the ground instead of running off into a storm drain.
Watch the video below to see one example of a rain garden installation from the University of Connecticut, then scroll down for detailed installation instructions.
Watch the video below to see one example of a rain garden installation from the University of Connecticut, then scroll down for detailed installation instructions.
Step 1. Assess the Site: Location, Size and Depth

Location
The following are important considerations when deciding where to put your rain garden:
The following are important considerations when deciding where to put your rain garden:
- To begin, pay attention to where rainwater runs off your property during a storm so you can strategically locate your rain garden to collect it.
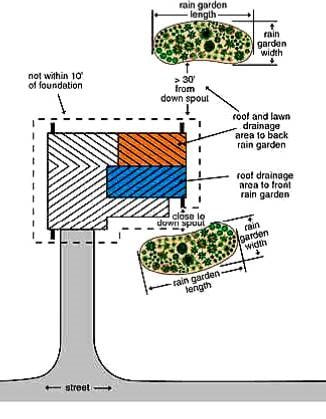
- Make sure that the location is at least 10 feet from your foundation, especially if collecting rainwater from a downspout. This will keep water from soaking in close to your foundation.
- Avoid any of the following locations:
- A place that water stands for more than 24 hours in your yard as soils will not allow water to soak in quickly enough to support a rain garden
- In existing drainage structures such as swales and ditches where plants might reduce the amount of water that the structure can hold
- Within 10 feet of or over a home septic system where the rain garden might interfere with its operation
- Under large trees where roots might be damaged during digging
- Consider sunny or partially sunny locations if possible. Rain gardens can be designed for shade, but sunny locations offer more plant choices.
- Perform 2-3 percolation tests across the area of your preferred location to make certain that the soils will allow the water collected by the rain garden to soak into the ground within 24 hours. See details under Size and Depth.
Size and Depth
Ideally, the rain garden should be sized to collect all the water from the area that will be drained, but this is not critical. Every rain garden helps! The ideal size will depend on how much area the rain garden will drain, how deep the garden will be and the type of soil you have. Here are some tips for sizing your rain garden:
- Pick a size and shape for your rain garden that will fit your landscape. Just plan a safe outlet for the water if the rain garden overflows.
- Determine how much area the rain garden will drain. Use a tape measure, the length of your pace, your house plans or an on-line satellite map with measuring tools , like the Lucas County Engineers Map to estimate that area. The bigger the drainage area, the bigger your rain garden will need to be to collect all the water that runs off.
- To determine how deep your rain garden should be, estimate the depth using the slope of your location as suggested in Homeowner’s How-To Guide: Rain Gardens for Northwest Ohio or perform a percolation test {see below). Your rain garden should not be any deeper than can drain in 24 hours to prevent standing water that can support mosquitoes
- Determine the type of soil that you have in your yard: sandy, silty or clayey. Perform a simple soil test by rolling a small quantity of moistened soil into a ball between your hands or flattening it into a ribbon between your thumb and index finger. Sand will break apart easily while clay will keep its shape. You can also use the NRCS Web Soil Survey at https://websoilsurvey.nrcs.usda.gov/app/ to look up the types of soil found in your area. The more sand that your soil has, the more quickly water will soak in. Soil that is mostly clay will drain slowly.
- Use the information that you have gathered and the diagrams, calculations and worksheets in the Homeowner’s How-To Guide to calculate an ideal size for your rain garden. A rain garden for a single downspout is usually about 8 feet by 10 feet, but typical residential rain gardens can range from 100 square feet to 300 square feet.
How to: Perform a Percolation Test
|
Step 2: Planning and Designing your Garden
The most successful rain gardens have been carefully planned. Here are some steps you can take to cover all the important bases:
- Draw a map of your property to scale using a grid or piece of graph paper. Add the rain garden in the location and size that you have determined will work for your yard and drainage area.
- Call Before You Dig to make yourself aware of any underground service lines or utilities where you will be installing your rain garden. The Ohio Utilities Protection Service (OUPS) number is 1-800-362-2764
- Decide how water will be directed to the rain garden, remembering that water flows downhill. Water may just run off a hard surface or across your lawn into the garden or you may choose to direct it there, especially if the source is a downspout, using one of these ideas:
- Route the water through a grassy swale
- Create a creek bed feature or a small waterfall using a rock-lined channel
- Use a 4 – inch plastic downspout extender or tile that can be either placed on top of the lawn or be buried
- Devise a safe outlet for the water should your rain garden overflow. The water may naturally flow away from your foundation and any structures on your property or you may need to use an existing drain or an overflow channel or pipe to route any excess water in a safe direction.
- As with any garden, choose plants that you like and that are appropriate for your soil type, moisture level, and sun exposure. Organize the selected plants into a layout for your rain garden using their bloom color, bloom time, texture and height. Plants that are the most water tolerant should be located in the bottom of the rain garden. As a rule of thumb, plan one plant for every square foot of rain garden. Simple templates for rain gardens and pollinator gardens are available on the Sacred Grounds page and elsewhere on-line.
- Plan for the materials and equipment that you will need to build and maintain your rain garden. Some commonly used materials and tools are listed below.
Common Materials and Tools
|
Rope, hose or marking paint
Organic herbicide, tarps Sod cutter Stakes or wood scraps Nylon cord or string Line level Pencil or marker Measuring stick or tape Shovels, mattock |
Rototiller
Wheelbarrow Compost, sand Moisture-loving native plants Shredded hard wood mulch Decorative rock or gravel Garden hose and sprinkler Utility flags or plant labels Tools for weeding and cutting back perennials |
Step 3: Build your Garden
Rain gardens may vary greatly in size, shape, soil type and plant selection, but the basic steps of installing a rain garden are the same. See these steps illustrated in the slideshow above!
- Outline the selected garden location using rope, hose, marking paint or whatever you have available.
- Remove the turf grass from the area. With advanced planning, spraying the area with organic herbicide and covering it with a tarp can effectively kill the grass. The grass can also be removed with a sod cutter or a shovel.
- Excavate the soil, creating a dish shape, flat on the bottom and slightly sloped on the sides. To begin put a stake or a series of stakes on the uphill side and the downhill side of the rain garden and connect each uphill stake with its corresponding downhill stake with a level string. The string on the uphill stake should be at ground level. Start digging on the uphill side and continue digging until the desired depth is reached, measuring down from the string and keeping the bottom of the rain garden as level as possible. A rototiller can be used to loosen the soil if available. If your rain garden is on a slope, the soil removed can be piled on the downhill side to make a berm level with the uphill side. This berm will hold back water that enters the garden, giving it time to soak into the ground. Note: If you are digging in a flat location, you will likely need a place to repurpose all the soil you are removing. In either case, the finished shape is the same, a large dish flat on the bottom and slightly upturned at the sides, allowing the water to spread out and soak in evenly.
- Reroute the water from the downspouts or hard surfaces to the rain garden. Use decorative stone or gravel at each entry point to diffuse the water and help prevent erosion.
- Use the native soils whenever possible and only amend them if necessary, Spread the compost or sand on top or add it to planting holes to keep disturbing the soil to a minimum. This protects the soil’s living organisms and reduces the number of weed seeds that could potentially sprout.
- Add the selected plants to your rain garden in the planned layout, planting one native plant about every square foot. Cover the surface of the rain garden with about three inches of mulch to help hold in the moisture and keep the weeds down. Water the entire garden well, saturating the soil, to give the plants the best possible start.
Step 4: Maintain Your Garden
Rain gardens can be low maintenance once the plants are established. However, good maintenance is critical to the success of your rain garden, both as neighbor friendly landscaping and a functional and beautiful addition to your yard. Here are some tips for doing it right:
- Water your plants regularly for the first growing season or until they become established, about twice per week when it does not rain. After that, they should not need watering except during periods of extreme drought.
- Until the plants fill in, apply about three inches of mulch annually to hold in moisture and keep weeds down. Reduce mulching as the plants fill in to leave more bare soil for our native bees.
- Weed your rain garden regularly for at least the first two years, pulling the weeds with their roots promptly to slow their spread. The time and frequency needed will decrease as your plants fill in, but some weeding will always be necessary to keep your garden looking nice.
- Avoid using fertilizer on your rain garden. Native plants are adapted to use the nutrients available in the soil and can grow excessively and become floppy when fertilizer is added. A little compost goes a long way and is better for our water quality.
- Trim back the seed heads and stems of your plants after each growing season. Ideally, this should be done the following spring so the plants can add winter interest to your garden and provide food and cover for our native wildlife, especially insects, birds and small mammals. At the end of a long winter when temperatures are consistently above 50 degrees is the perfect time to prepare for a new growing season.


